![]()

Basement Storage Solutions: 7 Proven Ways to Maximize Your Space in 2026
Most homeowners stare at their basement and see wasted potential. Between holiday decorations, seasonal gear, and overflow from the main house, that underground space either becomes a dumping ground or stays stubbornly underutilized. The good news: basement storage solutions don’t require hiring a contractor or demolishing walls. With strategic planning and the right systems in place, anyone can transform a cluttered basement into an organized, functional storage hub. This guide walks through seven practical methods to maximize space, protect stored items, and actually keep things organized long-term.
Key Takeaways
- Assess your basement layout, moisture levels, and ceiling height before implementing basement storage solutions to avoid costly mistakes and protect stored items.
- Maximize vertical space using wall-mounted shelving, pegboard, or slatwall systems to reclaim floor space and improve accessibility without permanent renovations.
- Use heavy-duty plastic bins with tight-sealing lids and desiccants to protect sensitive items like documents and electronics from basement humidity and temperature fluctuations.
- Install freestanding metal shelving units rated for 5,000+ pounds and position them 6 to 12 inches from exterior walls to improve air circulation and prevent moisture buildup.
- Create clear categories for stored items and label every bin, shelf, and storage zone so your basement storage stays organized and retrievable long-term.
- Capture dead space under stairs and in corners with custom shelves or drawers to maximize storage capacity without structural changes or professional installation.
Assess Your Current Basement Layout
Before buying a single shelf or container, take an honest look at what you’re working with. Measure the floor dimensions and ceiling height, note any areas where headroom drops (near joists or ducts). Identify which walls are load-bearing (typically exterior foundation walls and walls supporting the house above) and which are interior partition walls: this matters if you’re planning heavy shelving or structural changes.
Check for moisture problems. Basements are naturally damp, and water intrusion is the enemy of storage. Look for efflorescence (white mineral deposits on concrete), water stains, or active seepage. If moisture is an issue, you’ll need vapor barriers or dehumidifiers before storing anything valuable. Mark problem areas and plan adequate clearance around utilities, HVAC ducts, electrical panels, water heaters, and plumbing all need maintenance access.
Assess natural and artificial lighting. Dim basements make it hard to find things and encourage poor organization. Note where you might add LED strip lighting or work lights. Finally, sketch a rough floor plan noting existing fixtures, windows, and the best traffic flow. A 15-minute assessment upfront saves hours of frustration later.
Vertical Storage and Wall-Mounted Systems
The fastest way to reclaim basement floor space is to build upward. Wall-mounted systems make every cubic foot count and keep items accessible without floor clutter.
Pegboard and Hook Systems: A sheet of ½-inch pegboard mounted 16 inches on center to studs creates instant, customizable storage. Pegboard won’t hold heavy loads alone, the hooks do, but it’s ideal for hand tools, extension cords, sporting equipment, and seasonal decorations. Sand and prime pegboard before mounting to extend its life and improve appearance.
Wall-Mounted Shelving: Heavy-duty steel brackets rated for at least 50 pounds per shelf handle most household items. Bolt brackets directly into studs (standard framing members 16 inches apart) for maximum load capacity: anchors alone won’t support sustained weight. Mount shelves 12 to 18 inches apart vertically to fit most storage boxes while maintaining accessibility.
Slatwall Panels: An alternative to pegboard, slatwall features grooved plywood that accepts hooks and shelves. It’s more durable than pegboard and slightly more expensive, but it tolerates moisture better and accepts heavier loads. Install with shims to ensure level mounting, and leave a 1-inch gap behind panels for air circulation if moisture is a concern.
Safety Note: Wear safety glasses when drilling or cutting, and use a stud finder before fastening anything to walls. Fasten into studs, never solely into drywall anchors for heavy storage.
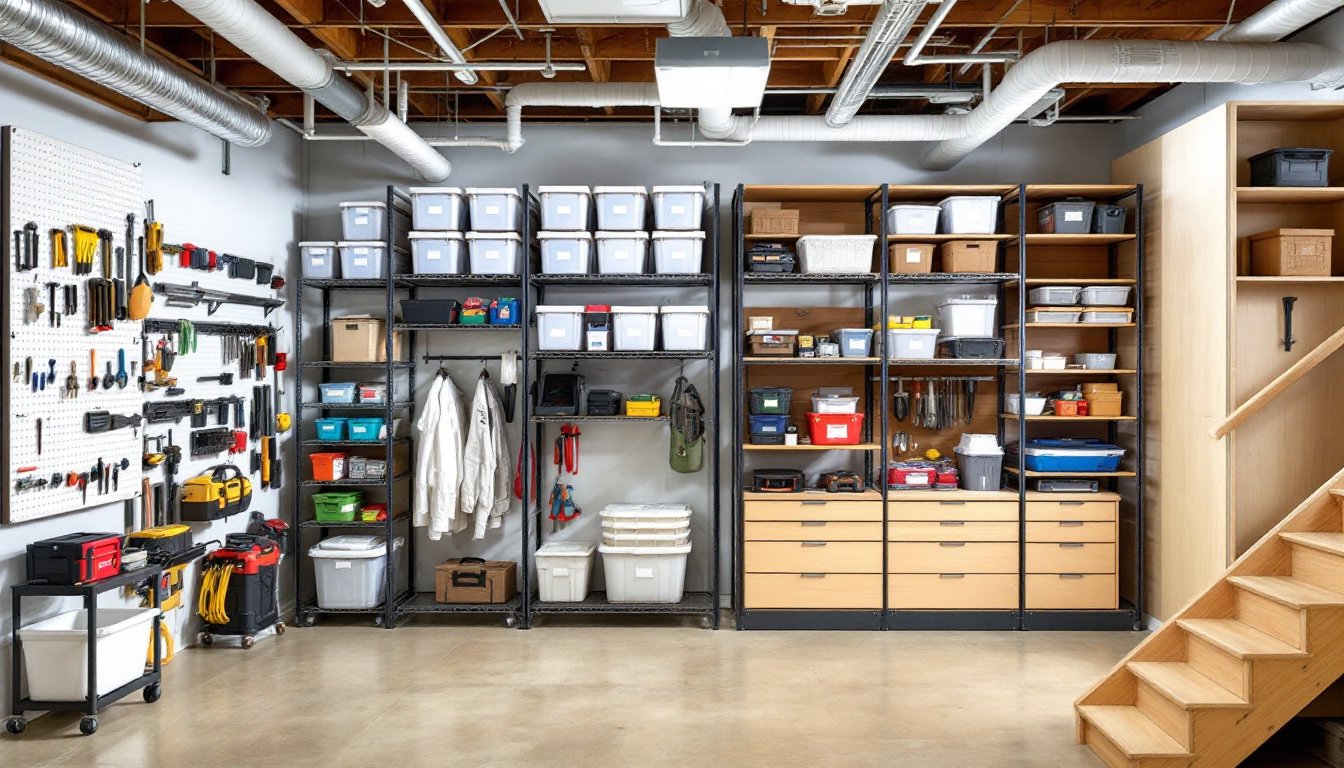
Shelving Units and Organization Racks
Freestanding shelving units offer flexibility without permanent installation, making them ideal for renters or anyone hesitant about wall modification. Metal adjustable shelving units, typically 72 inches tall, 36 to 48 inches wide, are workhorses in basements. Look for units rated to hold 5,000+ pounds total, with shelves spaced 18 to 24 inches apart.
When choosing shelving, consider what you’ll store. Heavy items (paint cans, tool boxes, archived documents) suit solid metal shelves. Lighter seasonal gear fits well on wire shelves, which allow better air circulation and moisture evaporation. Avoid particle board or solid wood in chronically damp basements, they absorb moisture and sag over time.
Installing Shelving: Most metal units use a bolt-together frame system requiring only a wrench. Position units slightly away from exterior walls (6 to 12 inches) to improve air flow and prevent moisture trapping. Ensure units are level: use shims under feet if the floor slopes. For units taller than 60 inches near foot traffic, secure the top to a wall stud to prevent tipping.
Capacity and Weight Distribution: Don’t overload shelves. Even heavy-duty units have limits, and uneven loading causes shelves to sag. Distribute weight evenly and place heavier boxes on lower shelves. A typical 36-inch wide metal shelf safely holds 75 to 100 pounds per shelf when properly rated and installed, check the manufacturer’s specification.
Climate-Controlled Storage Containers
Plastic storage bins protect contents from dust and minor moisture fluctuations, but basements demand extra care. Standard plastic containers work fine for non-sensitive items like sporting gear or holiday ornaments, but irreplaceable documents, electronics, and fabrics need better protection.
Container Selection: Invest in heavy-duty polyethylene bins with tight-sealing lids (not press-snap lids). Clear plastic lets you identify contents without opening: opaque bins work too but require good labeling. Size matters, 18-quart bins stack efficiently but lack capacity: 50 to 75-quart sizes balance storage density with manageable weight. Avoid overstuffing: bins should be 90 percent full at most.
Moisture Management: Place silica gel packets or activated charcoal inside bins to absorb excess humidity. Replace or reactivate these desiccants every 3 to 6 months. For serious moisture issues, consider a basement dehumidifier, a 50 to 70-pint unit running continuously costs roughly 15 to 25 dollars monthly in electricity but prevents mold and deterioration. Dehumidifiers also reduce that musty basement smell.
Elevating Containers: Stack bins on shelving, not directly on concrete floors, where standing water during heavy rain or drainage failures can occur. Even a single pallet or platform raises containers and allows air flow underneath. Keep bins away from sump pump discharge and water heater flush pipes.
What Not to Store: Never store open cleaning chemicals, paint, or gasoline in sealed bins, vapors need venting. Keep batteries, electronics, and anything with a battery separate: cold, damp basements shorten battery life significantly.
Utilize Under-Stair and Corner Spaces
Dead space under basement stairs and unused corners represents prime real estate that most homeowners overlook. These areas are cheap to outfit and solve storage bottlenecks.
Under-Stair Drawers and Shelves: Build a simple frame using 2×4 lumber along the stair stringers (the angled supports holding stair treads). Attach ¾-inch plywood shelves or sliding drawers to create custom compartments. The angled ceiling under stairs limits height, but shallow bins or flat storage boxes fit perfectly. This approach works best on open-sided staircases: enclosed stairs already have a wall that can be used for shelving.
Corner Shelving: Install corner shelves using L-shaped brackets or a dedicated corner shelving unit. These 24 to 36-inch deep shelves capture otherwise wasted corner space. One or two sturdy corner units can store significant volume. Tall corner shelving (5 to 6 feet high) maximizes vertical space without requiring wall-to-wall coverage.
Access and Safety: Ensure adequate lighting in corners so people don’t trip. Keep frequently accessed items within arm’s reach (eye level to waist height). Under-stair storage shouldn’t block egress in case of emergency, maintain clear pathways to basement exits and utility shutoffs. Check local building codes: some jurisdictions have rules about obstructing emergency routes.
Categorize and Label Your Items
Organization systems collapse without categorization. Even the best shelving becomes a dumping ground if people don’t know where things go.
Create Categories: Group items logically, seasonal decorations, tools, sports equipment, archived documents, seasonal clothing, and garden supplies each deserve a zone. Assign each category to a specific shelving unit, corner, or section of wall storage. Keep frequently used items (holiday decorations, seasonal sporting gear) at mid-level on shelves: store rarely accessed items higher or lower.
Labeling: Label every bin, shelf section, and drawer clearly. Use a label maker (inexpensive and professional-looking) or a permanent marker on painter’s tape. Include the category name and optionally an inventory (e.g., “Holiday Ornaments, 3 Boxes”). Photographs work too, snap a pic of bin contents and tape it to the front. Poor labeling means people can’t find items and waste time searching.
Maintain an Inventory: Keep a simple list (digital or printed) documenting what’s stored where. This prevents buying duplicates and helps you locate items quickly. Update it quarterly or when adding major items.
Regular Purging: Schedule a seasonal cleanup. When bins are clearly labeled and organized, it’s easier to identify duplicates, expired items, or things nobody uses anymore. Donate, sell, or responsibly dispose of things taking up valuable space.
Conclusion
Basement storage doesn’t demand expensive renovations or professional help. Start by assessing your space, then layer in solutions, vertical wall systems for accessibility, shelving units for capacity, containers for protection, and corner spaces for overlooked volume. The final ingredient is honest categorization and labeling so your system actually stays organized. Done well, a basement transforms from chaos into a functional, retrievable storage hub that works for years.